

Got a new pair of AirPods, second-generation AirPods, AirPod Pros, or AirPods Max? Once you know how to set up, connect, and configure them, you’ll discover why people who own a pair of Apple’s wireless earbuds or wireless over-ear headphones love them. We’re here to help get you started with this AirPods, AirPods 2, AirPods Pro, and AirPods Max guide, which will cover everything from Siri setting and volume control, noise-canceling, AirPods battery life and charging, how to rename your AirPods, and much more.
Índice de contenido
- 1 Apple AirPods Guide: AirPods, Second-Generation AirPods, AirPods Pro & AirPods Max Instructions
- 2 AirPods, 2nd-Generation AirPods, AirPods Pro & AirPods Max Guide Table of Contents
- 3 Connect/Pair Your AirPods, Second-Generation AirPods & AirPods Pro
- 3.1 Connect Your AirPods to an iPhone & Apple Watch
- 3.2 Pair 2nd-Generation AirPods, AirPods Pro & AirPods Max
- 3.3 Connect Two Pairs of AirPods to One iPhone
- 3.4 Pair AirPods to Your iPad or a Different iPhone
- 3.5 Pair AirPods, 2nd-Generation AirPods, AirPods Pro, or AirPods Max to Your Mac
- 3.6 Pair Your AirPods to an Apple TV
- 3.7 To Unpair Your AirPods from Your Apple TV:
- 4 Basics of AirPods, AirPods 2, AirPods Pro & AirPods Max Use
- 4.1 Turn Volume Up & Down on AirPods
- 4.2 Change Volume on AirPods 2, AirPods Pro & AirPods Max
- 4.3 AirPods Pro Audio Controls
- 4.4 AirPods Pro & AirPods Max Can Switch Between Noise Canceling & Transparency Mode
- 4.5 AirPods Max Digital Crown
- 4.6 Answer Calls with AirPods & Use Siri to Announce Calls
- 4.7 Other Helpful Siri Commands for Your AirPods
- 4.8 Switching Audio Output to AirPods, AirPods 2, AirPods Pro & AirPods Pro Max
- 5 How to Configure AirPods, 2nd-Generation AirPods, AirPods Pro & AirPods Max
- 6 Set Up Find My (Formerly Find My iPhone) & Find Lost AirPods, AirPods, AirPods Pro & AirPods Max
- 7 AirPods, Second-Generation AirPods, AirPods Pro & AirPods Max Battery Life & Charging
- 7.1 How to Check Your AirPod’s Battery Level
- 7.2 How to Check Your AirPod’s Battery Level on Your Mac
- 7.3 Check the Charge Status of Your Charging Case
- 7.4 How to Charge Your AirPods, Second-Generation AirPods, AirPods Pro & AirPods Max
- 7.5 Wireless Charging Case for AirPods & AirPods 2
- 7.6 Wireless Charging Case for AirPods Pro
- 8 How to Reset AirPods, AirPods 2, AirPods Pro & AirPods Max
- 9 Which Devices Can My AirPods Connect To?
- 10 Which Devices Can My AirPods 2 Connect To?
- 11 Which Devices Can My AirPods Pro Connect To?
- 12 Which Devices Can My AirPods Max Connect To?
Apple AirPods Guide: AirPods, Second-Generation AirPods, AirPods Pro & AirPods Max Instructions
The AirPods’ sound quality is crisp and clear for both listening and speaking through the built-in microphones. The wireless earbuds include a charging case with 24-hour life for easy battery management, while the AirPods Max offer a carrying case that preserves battery life. All versions have the ability to pair and unpair with many different Apple products. Apple CEO Tim Cook describes AirPods as “practically magic” and explains, “the pairing is seamless, and as someone is talking to you, if you take one out, the music will automatically stop, and if you replace, it starts again.” That goes for the latest member of the AirPods family, as well; the AirPods Max have all the features and convenience of the AirPods Pro in wireless, over-ear headphone form. Let’s get started learning how to use your “magical” new AirPods!
AirPods, 2nd-Generation AirPods, AirPods Pro & AirPods Max Guide Table of Contents
1. Connect/Pair Your AirPods, Second-Generation AirPods, AirPods Pro & AirPods Max
2. Basics of AirPods Use
3. How to Configure Original, Second-Generation AirPods, AirPods Pro & AirPods Max
4. Set Up Find My & Find Lost AirPods, AirPods 2, AirPods Pro & AirPods Max
5. AirPods, Second-Generation AirPods, AirPods Pro & AirPods Max Battery Life & Charging
6. How to Reset AirPods, AirPods 2, AirPods Pro & AirPods Max
7. Which Devices Can My AirPods Connect To?
8. Which Devices Can My AirPods 2 Connect To?
9. Which Devices Can My AirPods Pro Connect To?
10. Which Devices Can My AirPods Max Connect To?
Connect/Pair Your AirPods, Second-Generation AirPods & AirPods Pro
Let’s get started learning how to pair your AirPods.
Connect Your AirPods to an iPhone & Apple Watch
- Make sure you are signed in to your iCloud account on your iPhone; we’ll get to the “why” of this step later.
- Navigate to the Home screen on your iPhone, then bring the AirPods close to your phone; they should be in their case, and the case should be open.
- Within a few seconds, you’ll see a screen asking if you’d like to connect your AirPods to your iPhone.
- Tap Connect, then tap Done when your devices are finished pairing.
- If you have an Apple Watch paired to the iPhone you just connected your AirPods to, your AirPods will be connected to your Apple Watch as well. Sound will automatically switch between your Apple Watch and iPhone.
Pair 2nd-Generation AirPods, AirPods Pro & AirPods Max
- If you’ve already set up “Hey Siri” on your iPhone, then you’ll automatically be able to use this feature with your AirPods 2 and AirPods Pro. If you haven’t yet set up Hey Siri, don’t worry, there will be step-by-step instructions on your device to guide you through the process.

Connect Two Pairs of AirPods to One iPhone
Beginning with iOS 13, AirPods users are able to pair two sets of AirPods to one iPhone. This feature makes it possible for two people to listen to the same music, podcast, audiobook, and other media from one iPhone.
Pair AirPods to Your iPad or a Different iPhone
If your iPhone and iPad are signed in to the same iCloud account using the same Apple ID, you’ll be able to bring your AirPods close to your iPad, and they’ll automatically pair. If you haven’t taken this step, it will take a little more effort to pair your AirPods to your iPad. These directions also work for pairing your AirPods to a different iPhone.
- Hold your AirPods, case open, close to your iPad.
- Tap Connect when a prompt like the one below appears.

- Press and hold the Setup button as directed.

- You’ll see a message like the one below indicating that your AirPods are connecting to your iPad.

- Tap Done when the AirPods have finished pairing, and you’ll be able to begin using them.

Pair AirPods, 2nd-Generation AirPods, AirPods Pro, or AirPods Max to Your Mac
If you already paired your AirPods to your iPhone and your Mac is signed in to the same iCloud account with the same Apple ID, pairing will be quick.
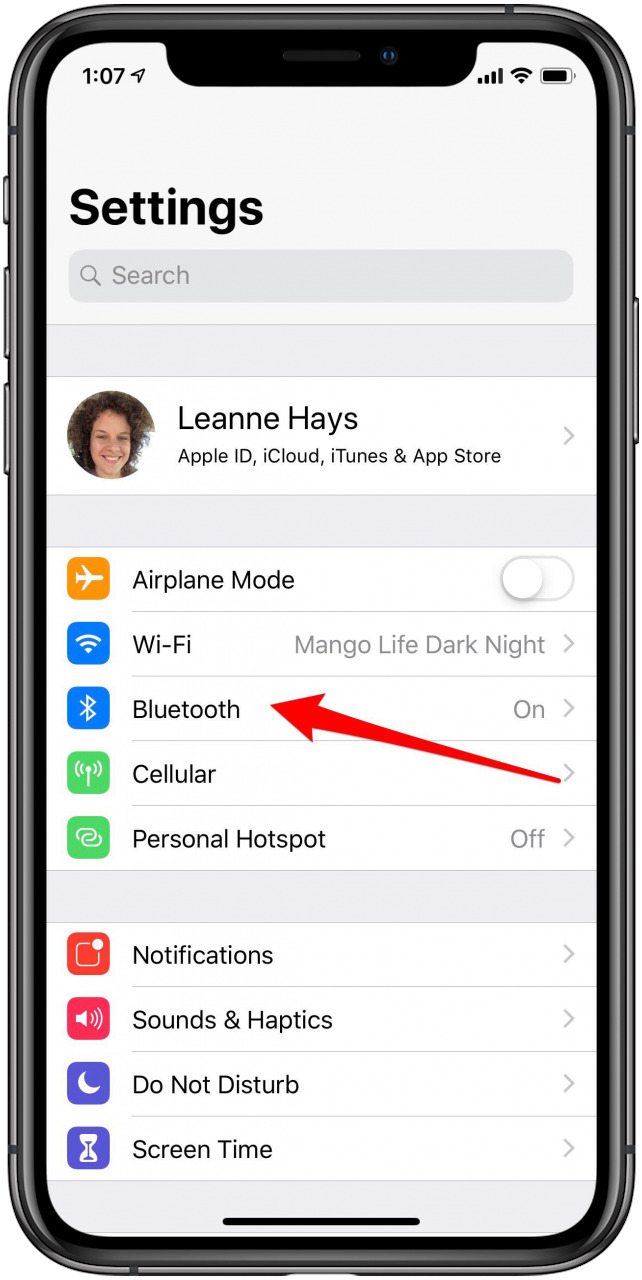
- Put your AirPods in your ears, then click on the Apple icon in your Mac’s Menu Bar, then choose System Preferences.
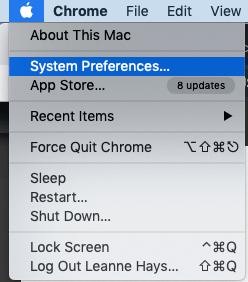
- Click on Bluetooth in the System Preferences menu.

- You’ll see a menu of Bluetooth devices available; choose your AirPods.

- If you don’t see your AirPods in the Bluetooth options, you’ll need to make sure Bluetooth is enabled on your Mac.
- Check the status under the Bluetooth symbol.
- Click Turn Bluetooth On.

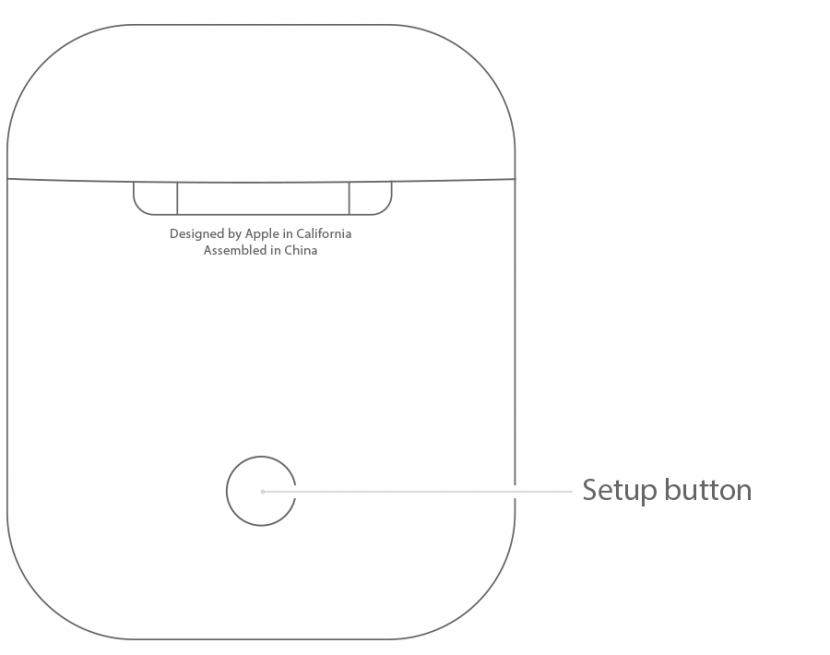
- Once Bluetooth is on, hold your AirPods case with the lid open and AirPods inside near your Mac.
- Press and hold the Setup button on the back of the case until the Status light begins to flash white.
- Your AirPods should now be an option in the Bluetooth menu.
- Once your AirPods are paired with your Mac, you can choose to listen to audio from your Mac through the AirPods by opening System Preferences again and choosing Sound.

- You’ll see your AirPods in the Output menu; click on them.

Pair Your AirPods to an Apple TV
*AirPods can connect to your Apple TV if it’s running tvOS 11 or later, whereas second-generation AirPods require an Apple TV running at least tvOS 12.2, and AirPods Pro require an Apple TV running tvOS 13.2 or later.*
Beginning with iOS 11, the Apple TV joined the group of devices that can automatically pair to your AirPods if it’s signed in to iCloud using the same Apple ID. If your Apple TV isn’t signed in using the same Apple ID, you can follow the manual setup instructions below.
To connect your AirPods to your Apple TV:
- Open your AirPods case, leaving the AirPods inside, and bring them close to your Apple TV.
- Press and hold the Setup button on the back of the AirPods case.
- Open the Settings app on your Apple TV.
- Select Remotes and Devices, then select Bluetooth.
- Choose your AirPods from the list of devices that appears, then choose Connect Device.
Once your AirPods have been paired to your Apple TV, you can select them from the menu of recognized devices any time you want. Just navigate to your Apple TV’s Home Screen and press the Play button on the remote. A menu of paired devices will appear; choose your AirPods.
To Unpair Your AirPods from Your Apple TV:
- Go back to the Settings app.
- Select Remote and Devices; then select Bluetooth.
- Choose your AirPods from the list.
- Select Forget Device and then Confirm.
Basics of AirPods, AirPods 2, AirPods Pro & AirPods Max Use
AirPods are meant to be a seamless and helpful addition to your daily experience with Apple devices. They’re ready to use as soon as you take them out of their case, and when you put one or both in your ears, they start playing audio automatically. When you take one AirPod out, your audio will pause, and when you take both out, it stops altogether. Here are a few more things you should know about how your AirPods work:
Turn Volume Up & Down on AirPods
You can adjust the volume on your AirPods by asking Siri to do it, either by saying “Hey Siri, turn up (or down) the music”, or by asking Siri to raise or lower the volume by a percentage. To learn more, follow our tutorial on how to raise or lower the volume on your AirPods.
Change Volume on AirPods 2, AirPods Pro & AirPods Max
If you’re using second-generation AirPods or AirPods Pro, you can raise or lower the volume by using the same Siri commands available on the original AirPods. You can also change the volume from your iPhone’s Lock Screen by using the volume slider in whichever app you’re listening to. For a third option, open your iPhone’s Control Center and adjust the volume by dragging the volume slider up or down. If you’re listening through a set of AirPods Pro that is synced to your Apple Watch, you can open Now Playing on your watch, then use the Digital Crown to adjust the volume.
AirPods Pro Audio Controls
The AirPods Pro use the new Force sensor for a variety of purposes. Press the Force sensor once to pause your audio, and press again to resume. Double-press the Force sensor to skip forward, and triple-press to skip back.

AirPods Pro & AirPods Max Can Switch Between Noise Canceling & Transparency Mode
One of the most useful features of Apple’s latest wireless earbuds and headphones is the ability to switch back and forth between Noise Cancellation and Transparency modes. Noise Cancellation reduces or eliminates sounds coming from external as well as internal sources, while Transparency allows those sounds in, so you’re more aware of your environment. To change between these modes, press and hold the force sensor on the stem of your left or right AirPods Pro until you hear a chime. If you’re wearing just one of your earbuds, pressing and holding the force sensor will switch the audio between Transparency mode and off. If you have a set of AirPods Max, press the noise control button to switch to Transparency mode.

AirPods Max Digital Crown
The AirPods Max have a feature that isn’t shared by the rest of the AirPods family, a Digital Crown. Max owners can play or pause audio, control volume, skip tracks, end and answer phone calls, and summon Siri with the Digital Crown.

Answer Calls with AirPods & Use Siri to Announce Calls
Another useful feature for AirPods and AirPods 2 users is the ability to answer calls with your AirPods by double-tapping either AirPod and then double-tapping again to disconnect.

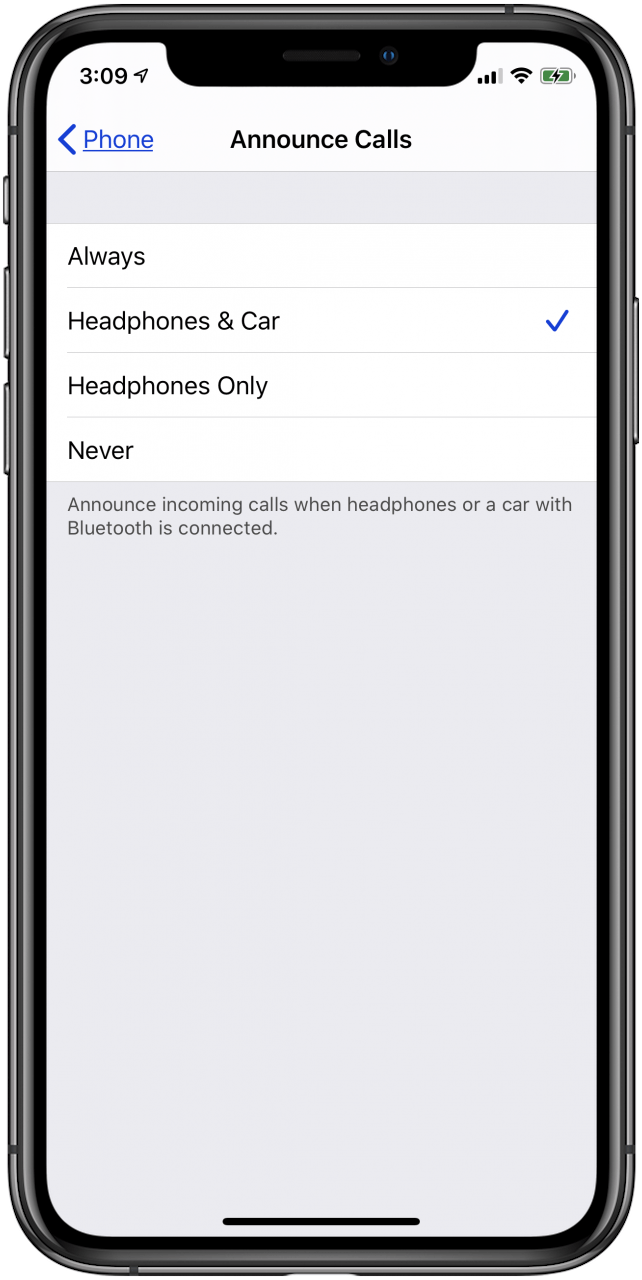
You can also have Siri announce your incoming calls by opening the Settings app > tap Phone > tap Announce Calls and choosing Always, Headphones & Car, or Headphones Only. If you decide to turn this feature off, return to the Announce Calls settings, and choose Never.

Other Helpful Siri Commands for Your AirPods
Besides asking Siri to announce calls, you can also use your AI assistant to do other AirPods related tasks. Learn how to turn on Hey Siri on your paired iPhone, then try some of these commands and questions:
- “Hey Siri, turn up (or down) the volume.”
- “Hey Siri, skip to the next song.”
- “Hey Siri, pause the music.”
- “Hey Siri, play my Workout playlist.”
- “Hey Siri, how do I get to work from here?”
- “Hey Siri, where’s the nearest coffee shop?”
If you own a pair of AirPods 2, you won’t have to double-tap your earbud to summon Siri, although that option is still available.
Switching Audio Output to AirPods, AirPods 2, AirPods Pro & AirPods Pro Max
If you have your iPhone, iPad, or iPod Touch paired with multiple speakers or headphones, you’ll want to know how to choose AirPods to play audio from on that device. For example, to choose your AirPods for audio output on your iPhone:
- Open the Control Center on your iPhone by swiping down from the top-right corner of your screen for the iPhone X or later, or up from the bottom of the screen for earlier iPhones.
- Tap the audio card in the upper-right corner of your Control Center, then touch and hold the pyramid icon when the card opens.
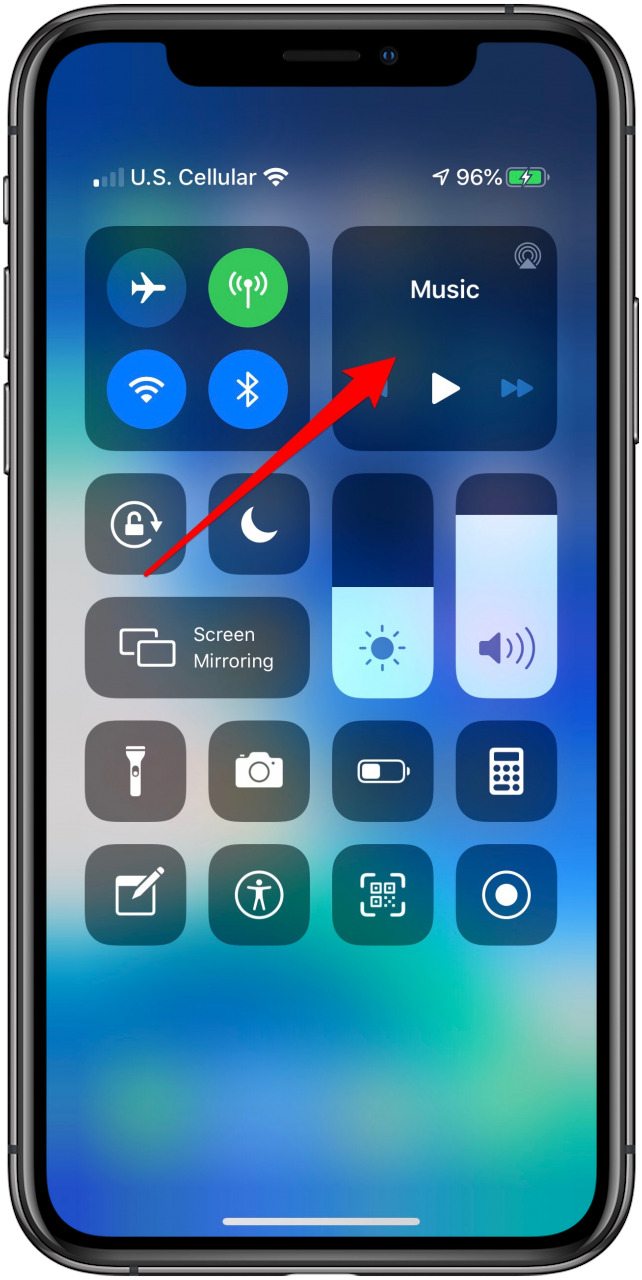

- Now you’ll see the option to change audio output to all the Bluetooth devices connected to your iPhone; you can tap on AirPods to choose them.

How to Configure AirPods, 2nd-Generation AirPods, AirPods Pro & AirPods Max
You can use your iOS device to configure your AirPods in the following ways:
The AirPods & AirPods 2 Double-Tap Shortcut
The AirPods 2 can use the new touch-free “Hey Siri” prompt to accomplish all the tasks that previously required a double-tap. If you’ve gotten used to tapping your AirPods and want to keep using this gesture, though, it still works with the AirPods 2.
We went over how to answer or hang up a call using the double-tap above, but you have several other options for how to configure your AirPods so they’ll respond differently to the double-tap. Learn how to use your left or right AirPod to play or pause audio, skip to the next track, jump back to the previous track, or turn your AirPod off.
- You can find all these double-tap options on your iPhone by opening the Settings app and tapping Bluetooth to open a list of paired Bluetooth devices.
- Next, tap the info icon next to AirPods and tap on each AirPod to choose the function that you want it to control from the menu of AirPod functions.
Turn Off Automatic Ear Detection on Your AirPods
Using the same steps you took to arrive at the double-tap shortcut options, you can also choose to enable or disable automatic ear detection. Just open the Settings app on your iOS device as before, then select Bluetooth and tap on the lower-case i next to your AirPods. From here, you’ll be taken to this screen:

Toggle Automatic Ear Detection off if you don’t want audio to switch from your paired device to your AirPods whenever you put one or both AirPods in your ears.
Microphone Controls for Your AirPods
You can also adjust your AirPod’s mic settings from this same page. Tap on Microphone underneath Automatic Ear Detection, and you’ll see this screen:

You can decide to let your AirPods Microphone automatically switch back and forth from left to right as needed, or to always use the left or right earbud for mic function. The automatic option allows your microphone to remain functional even if you’re only using one AirPod.
Rename Your AirPods
If you’d like to rename your AirPods:
- Open the Settings app on your iPhone, iPad, or iPod touch.
- Tap on Bluetooth.
- Tap the lower-case i next to your AirPods.

- Tap Name.
- Tap the x to the right of your AirPod’s name and enter the new name you prefer.


Change Force Sensor Settings on Your AirPods Pro
As mentioned previously, pressing and holding the Force Sensor allows AirPods Pro users to switch between Transparency and Noise Cancellation modes. If you’d like to change your Force Sensor commands, follow the previous instructions to open the Settings app, tap Bluetooth, then tap the lower-case i next to your AirPods Pro. Your AirPods Pro menu will give the option to change the press and hold function for the left, right, or both earbuds. You can choose to use the press and hold controls for noise control modes, or leave one for noise control and use the other for Siri commands.

Set Up Find My (Formerly Find My iPhone) & Find Lost AirPods, AirPods, AirPods Pro & AirPods Max
Apple revamped Find My Phone with iOS 13, and now it’s a combination of Find My iPhone and Find My Friends, simply called Find My. Once you’ve set up Find My, you’ll be able to see the location of all the devices signed in under your Apple ID from the Find My app or at iCloud.com. In addition, your lost device will send out Bluetooth signals even if it’s offline and asleep. These signals can be detected by nearby Apple devices, which will relay a location to the Find My app to help you find your missing Apple tech. This is an important step in safeguarding your devices should any of them get lost or stolen, including your AirPods, AirPods 2, AirPods Pro, or AirPods Max.
Once you’ve paired your AirPods to an iPhone, iPad, or iPod Touch that’s signed in to your Apple ID and has Find My set up, they’ll be automatically included in the feature and visible on the Find My map.

Here’s where this feature gets really useful; if your AirPods are near a paired device and within Bluetooth range, you can activate a two-minute tone that gets gradually louder, helping you locate one or both earbuds. To turn this on:
- Tap on your AirPods in the Devices list under the map, then tap Play Sound.
- If you don’t know how to navigate to the location of your AirPods, tap Directions, and Apple’s Maps app will open and direct you.


- If you’ve only lost one AirPod, or if you’ve found one but not the other, you can tap Mute Left or Mute Right to hone in on the location of the missing earbud.
- Tap Stop Playing once you’ve found your AirPods and want the tone to stop, or repeat the process if two minutes wasn’t long enough to locate both earbuds.

*Note: This feature works if your AirPods are out of their case or if the case is open. If the case is closed with the earbuds inside, you’re out of luck because the tone will not sound. I hope Apple repairs this deficit in an upcoming operating system!*
If you see No location found next to your AirPods, they’re out of range of your connected device or out of battery; the map will show the last time and location they were traceable. If your AirPods come back within range or if they’re charged, you’ll receive a notification on your paired device.
AirPods, Second-Generation AirPods, AirPods Pro & AirPods Max Battery Life & Charging
Apple’s original AirPods last a fairly long time per charge; two hours of talk time or five hours of listening. Even better, if you’ve fully charged your AirPods case, you’ll be able to talk for up to eleven hours and listen for up to 24 hours as long as your recharge the AirPods in the case. The second-generation AirPods can last even longer between charges; three hours of talk time, five hours of listening time, and a more than 24-hour battery life with a fully-charged battery case! Apple’s new AirPods, the AirPods Pro, offer up to five hours of listening time and 3.5 hours of talk time. With a fully-charged case, your AirPods Pro will last for more than 18 hours of talk time or 24 hours of listening time. The AirPods Max offer 20 hours of listening and talk time. So, how do you know your AirPods need a charge? Let’s go over how to check your AirPod’s battery levels, both the charging case and the earbuds themselves.
How to Check Your AirPod’s Battery Level
You can use your iPhone, iPad, iPod Touch, or Mac to check the charge status of your AirPods and their case. To check with one of your iOS devices:
- Your AirPods will need to be connected to the device you’d like to use to check their charge status.
- Open your AirPods case, leaving your AirPods inside, and hold the open case near your iPhone, iPad, or iPod Touch.
- The battery levels of both your AirPods and their charging case will appear on screen within a few seconds.
- You can also check these levels using the Batteries widget in your Today View. Learn how to add the battery widget to your Today View if you haven’t already done so.


- Another way to check the battery levels on your AirPods and their case is to ask Siri.

How to Check Your AirPod’s Battery Level on Your Mac
- Open the lid of the charging case or remove your AirPods from their case.
- Click the Apple icon in your Mac’s menu bar, then tap System Preferences, then Bluetooth.
- You’ll see your AirPods in the Bluetooth menu, along with a graphic of how full or depleted their batteries are.

Check the Charge Status of Your Charging Case
It’s easy to tell at a glance if your AirPods case needs a charge. The new wireless charging case has a status light on the front, while the original case has the status light on the inside of the lid. For both accessories, if the light glows amber if less than a full charge is remaining and green if it’s fully charged.
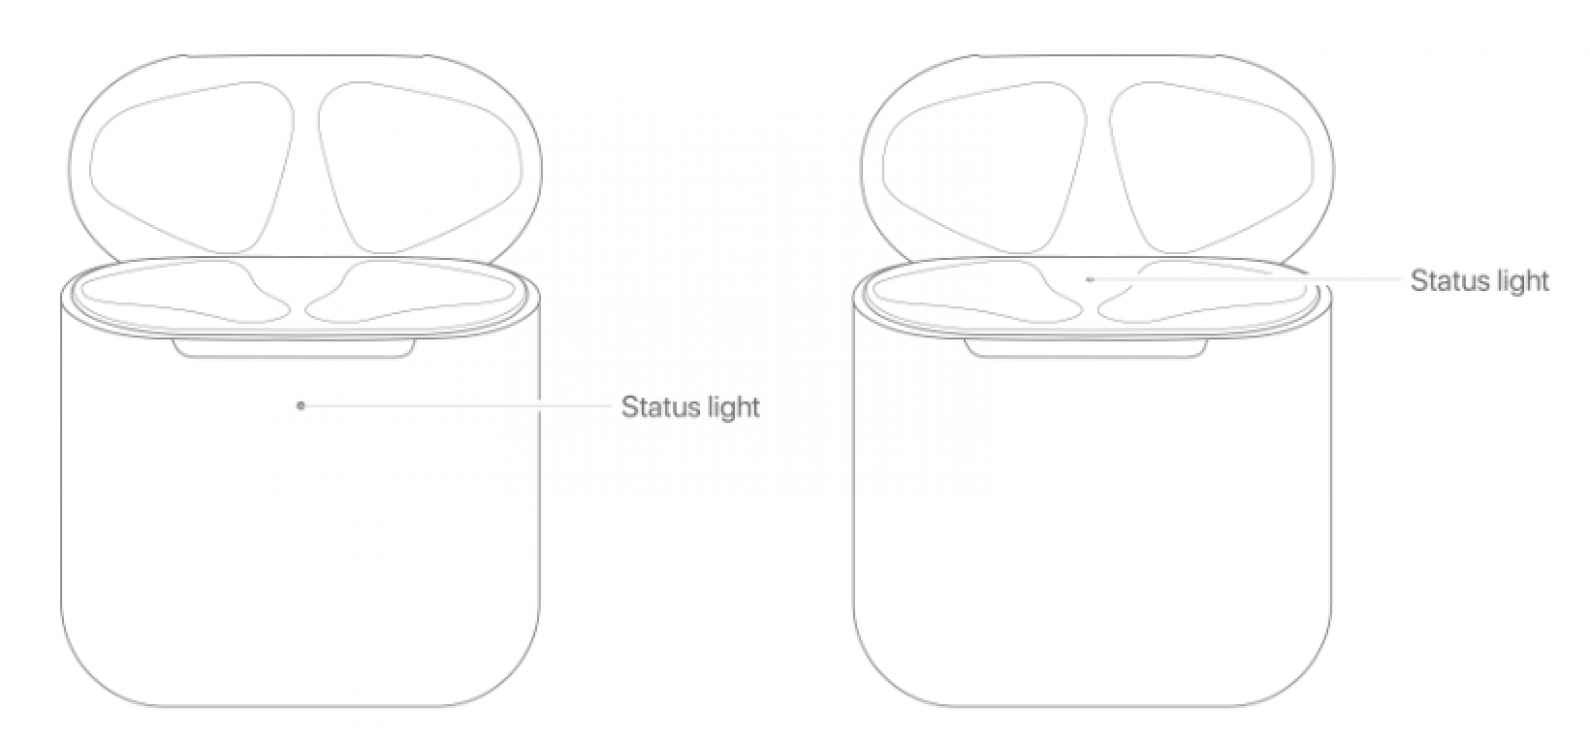
If your AirPods are inside their case with the lid open, the status light will indicate the charge level of your earbuds rather than the charging case. Again, green indicates a full charge, and amber means that your AirPods need to be topped off.
If you are charging your AirPods case on a wireless charging mat, the Status light will glow for eight seconds when you place the case on the mat, green for fully charged, amber if more charge is needed. If you have the new AirPods Pro, you can tap the case while it’s on the mat to see if it’s fully charged yet.
How to Charge Your AirPods, Second-Generation AirPods, AirPods Pro & AirPods Max
If your AirPod’s batteries are depleted, you’ll hear a tone in one or both earbuds indicating that your batteries are low. If you don’t charge after that, you’ll hear one more tone before your wireless earbuds shut down. So how do you go about charging your AirPods? As long as the case has a charge, all you need to do is put your earbuds into the charging case and close the lid.
To charge the AirPod case, plug the charging case into a power source with the USB to Lightning cable it came with. If you’ve purchased the new wireless charging case, you can also place the case on a wireless charger.
In only fifteen minutes, your AirPods will have charged enough for three hours of listening or over an hour of talk time. If you have a set of the new AirPods Pro, only five minutes of charge time will get you over an hour of talk or listening time! Plug your AirPods Max in for five minutes with your Lightning connector and add 1.5 hours of battery life. When you aren’t using your AirPods, keep them in the case to preserve their charge. You can also opt to use only one AirPod and switch back and forth from using the left or right earbud to save battery life.
Wireless Charging Case for AirPods & AirPods 2
Apple announced a wireless charging case for AirPods at the same time it revealed the second-generation earbuds. Now you can charge your original AirPods or AirPods 2 without using a cable; just fifteen minutes of charging in the new wireless case will allow for up to three hours of listening. You can purchase a second-generation pair with the wireless case for $159, or purchase just the wireless charging case for your original AirPods for $79.

Wireless Charging Case for AirPods Pro
The wireless charging case introduced with Apple’s second-generation AirPods can be used on the original AirPods, as well. Unfortunately, the charging case for the AirPods Pro only works for those earbuds, and not the first two generations of AirPods. The case is included in the cost of the wireless earbuds, which rings in at $249.
How to Reset AirPods, AirPods 2, AirPods Pro & AirPods Max
If you’re having battery or other issues with your AirPods, you can reset them using your iOS device. To reset:
- Put your AirPods in their case and close the lid. Wait 30 seconds, then open the lid.
- Open the Settings app on your iPhone, iPod Touch, or iPad and tap Bluetooth.
- Tap the lower-case i icon next to the AirPods that need to be reset.
- Tap Forget This Device and confirm your choice.


- Now, with your AirPods in their case and the lid open, press and hold the Setup button for at least 15 seconds.

- The Status light should flash amber; if it doesn’t, you’ll need to close the case lid and connect the case to power for at least ten minutes, then try again.
- Once the Status light flashes amber, you can reconnect your AirPods to your devices (it will have disconnected from all devices that share the same iCloud account). Some customized settings will need to be set up again.
Which Devices Can My AirPods Connect To?
To use your AirPods, you’ll need to connect them to one of the devices listed below.
iPhone, iPad &iPod Touch
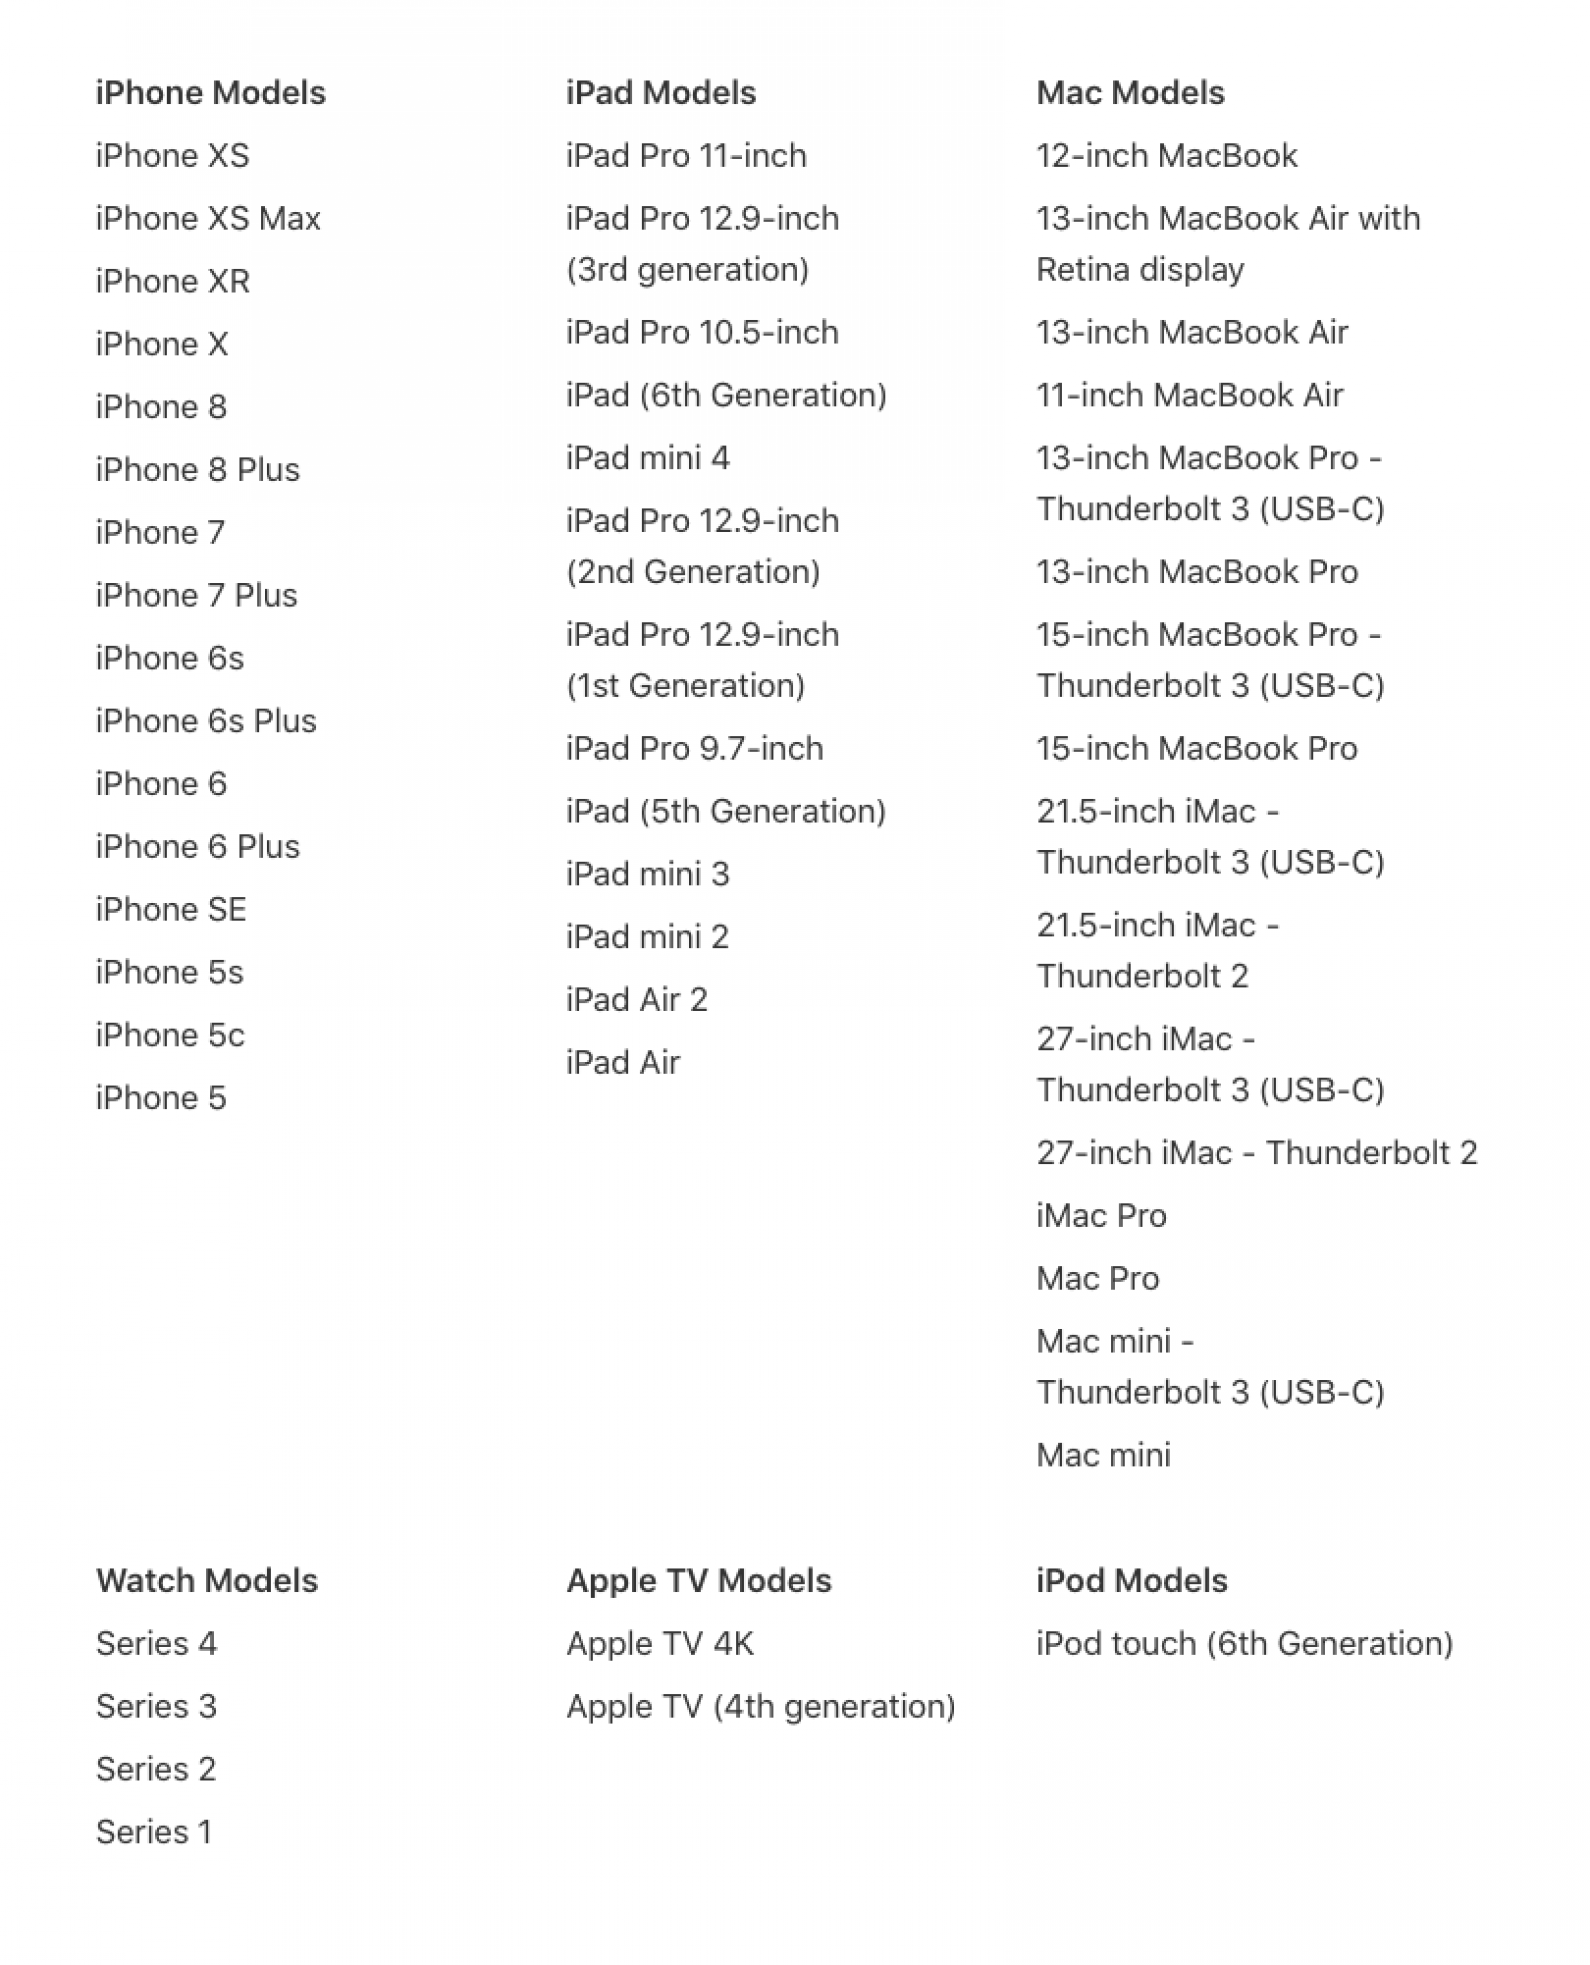
If you have an iPhone, iPad, or iPod Touch that’s updated to iOS 10 or later, you’ll be able to pair it with your AirPods. Check below to see if your device is able to update to iOS 10 or later.
Apple Watch
If you’d like to pair your AirPods to your Apple Watch, your watch must be updated to watchOS 3 or later.
Apple TV
If you want to connect your Apple TV to your AirPods, you’ll need the Apple TV to be updated to tvOS 11 or later.
Mac
To pair your AirPods to your Mac, make sure your Mac is updated to macOS Mojave or later.
Which Devices Can My AirPods 2 Connect To?
Second-generation AirPods are a bit more limited in which devices they can connect to. Read on to learn which devices running which operating systems will pair with your new earbuds.
iPhone, iPad & iPod Touch
If you have an iPhone, iPad, or iPod Touch that’s updated to iOS 12.2 or later, you’ll be able to pair it with your AirPods.
Apple Watch
If you’d like to pair your AirPods to your Apple Watch, your watch must be updated to watchOS 5.2 or later.
Apple TV
If you want to connect your Apple TV to your AirPods, you’ll need the Apple TV to be updated to tvOS 12.2 or later.
Mac
To pair your AirPods to your Mac, make sure your Mac is updated to macOS Mojave or later.
Which Devices Can My AirPods Pro Connect To?
Apple’s latest version of the AirPods, the AirPods Pro, can connect to the following:
iPhone, iPad & iPod Touch
If you have an iPhone or iPod Touch that’s updated to iOS 13.2 or later, or an iPad that’s updated to iPadOS 13.2, you’ll be able to pair it with your AirPods Pro.
Apple Watch
If you’d like to pair your AirPods Pro to your Apple Watch, your watch must be updated to watchOS 6.1 or later.
Apple TV
If you want to connect your Apple TV to your AirPods Pro, you’ll need the Apple TV to be updated to tvOS 13.2 or later.
Mac
To pair your AirPods Pro to your Mac, make sure your Mac is updated to macOS Catalina or later.
Which Devices Can My AirPods Max Connect To?
Apple’s wireless, over-ear headphones can connect to:
iPhone, iPad & iPod Touch
If you have an iPhone that’s updated to iOS 14 or later, or an iPad that’s updated to iPadOS 14, you’ll be able to pair it with your AirPods Max. You’ll need the iPod Touch 7th generation to pair with the AirPods Max.
Apple Watch
If you’d like to pair your AirPods Max to your Apple Watch, your watch must be updated to watchOS 7 or later.
Apple TV
If you want to connect your Apple TV to your AirPods Max, you’ll need an Apple TV 4K updated to tvOS 14 or later.
Mac
To pair your AirPods Max to your Mac, make sure your Mac is updated to macOS Big Sur or later.
Publicaciones relacionadas:
 Cómo cancelar un comando de Siri
  Cómo encender la linterna en su iPhone con “Hey Siri” en iOS 12
  Grabe videos de iPad con Elgato Game Capture HD
  Consejo del día: ¿No sabes qué preguntarle a Siri? Siri te lo dirá
  Cómo cambiar un destinatario de correo de CC a CCO en su iPhone
  Cómo enviar dinero a alguien a través de Paypal en iPhone
  Estas son las novedades de iOS 8
  Steel Series Nimbus: un controlador de juego versátil para dispositivos Apple
  Revisión: la funda para iPad a prueba de niños de UZBL es ideal para escuelas
  Blog de Apple Event Live: ¡Oh, mira! ¡Es un iPad Pro para bebés! IPad de 9,7 pulgadas compatible con Apple Pencil
  Muebles de carga inalámbrica de bricolaje: haga una estación de carga para iPhone con un presupuesto
  Revisión del juego Tropico para iOS